You just finished the project, and one crucial step stands between your hard work and your paycheck. Handing clients a messy bill is like offering a sloppy handshake—it instantly undermines your credibility. A well-crafted document does much more than ask for money; it builds trust and actively guides the invoice-to-payment cycle.
Clear presentation directly impacts how quickly those funds hit your bank account. In practice, finding the right contractor invoice example can completely transform your cash flow. Take a freelance graphic designer who recently reduced her payment wait time by five days simply by upgrading her header design. By utilizing professional document branding to make her paperwork look like a digital letterhead, she visually justified her premium rates.
Staring at a blank page often feels intimidating, but creating a zero-question bill is surprisingly straightforward. A professional billing format for independent contractors effectively communicates value and expectations. Mastering these basic layout secrets removes the stress of asking for money so you can focus entirely on doing great work.
The Checklist for Essential Billing Information: What the IRS and Clients Actually Need
Sending a bill should feel rewarding, but many freelancers face a stressful question: exactly what information is required on a contractor invoice? Ultimately, client accounting departments just want to process your payment without needing to call you for missing details.
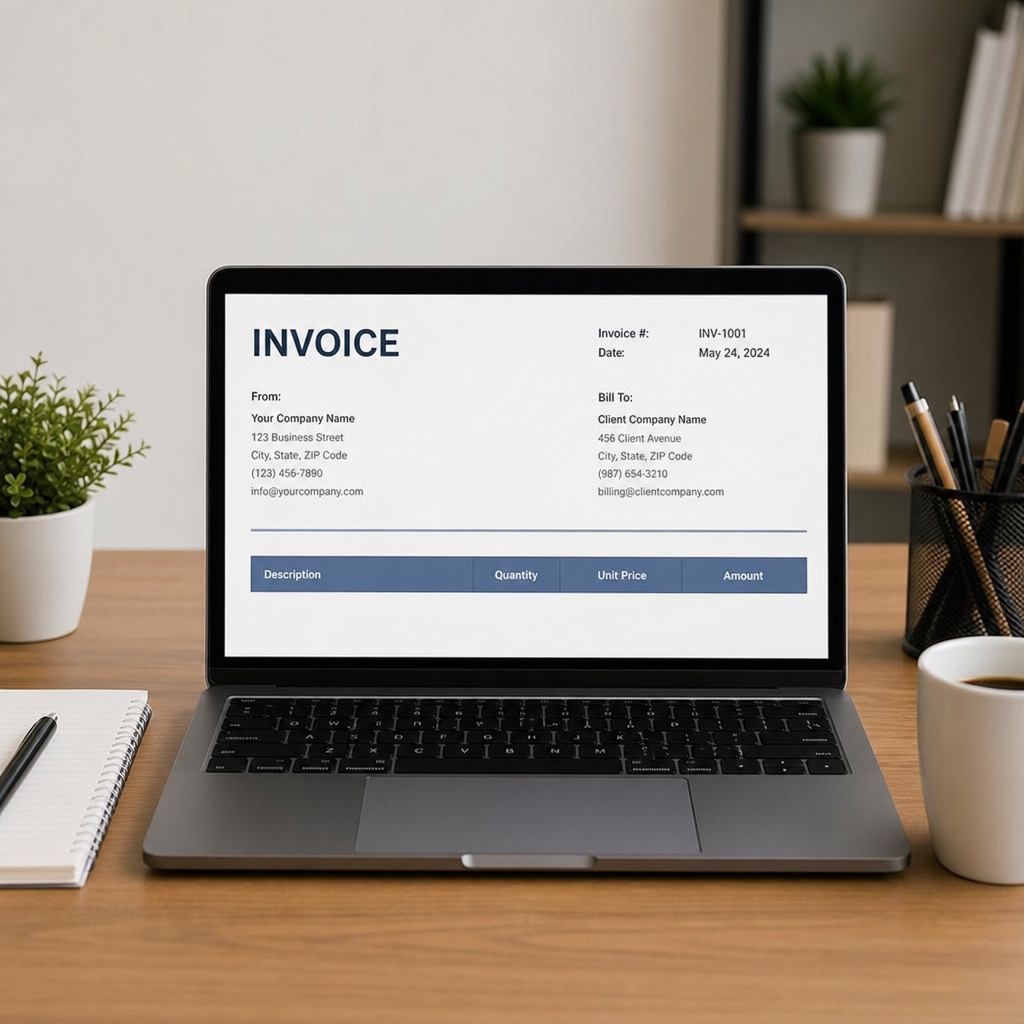
To avoid administrative headaches, start by getting your identification right. Your digital header must feature a "remittance address"—the exact physical location where checks should be mailed. It also requires proper tax identification number placement on billing documents. Placed just below your contact info, this aligns with standard IRS Form W-9 requirements for contractors so companies can easily report what they paid you.
Another essential trick is invoice sequencing, sequentially numbering your bills (like #1001, then #1002). This unique numbering prevents lost payments because both you and the client can track exactly which specific document is being paid.
For a completely seamless process, verify your header contains this seven-point checklist:
- Your Business Name
- Remittance Address
- Tax ID Number
- Unique Invoice Number
- Issue Date
- Client Contact Info
- Payment Due Date
With the administrative rules handled, the next critical component is building a detailed project scope breakdown to turn vague tasks into clear line items.
Building a Detailed Project Scope Breakdown: Turning Vague Tasks into Clear Line Items
Have you ever received a repair bill that simply said "Work Done" and felt a sudden wave of panic? Your clients feel the exact same "sticker shock" when they cannot see exactly what they are paying for. Creating a clear "shopping list" of your services prevents this anxiety.
To stop those frustrated emails before they start, you need to confidently answer a common question: how to bill clients for labor and materials? Separating the physical items you bought (like paint or lumber) from the time you spent doing the work builds immediate trust. It also leaves a reliable paper trail in case the client needs warranty work later.
When creating a detailed project scope breakdown, think of your invoice as a detailed receipt. Instead of lumping everything together, use line item granularity—breaking large jobs into smaller pieces based on unit pricing (the specific cost per single item or hour). Use this simple construction invoice line items checklist to see the difference:
- Vague: "Kitchen sink repair - $350"
- Clear: "Material: 1 Moen Faucet - $150"
- Clear: "Labor: 2 Hours Plumbing Installation at $100/hr - $200"
Providing this level of clarity ensures your client never has to guess where their money went. If you work in the trades, an invoice format for construction that clearly separates labor and materials reinforces this transparency. Mastering individual task and material lists naturally transitions into choosing the right billing model.
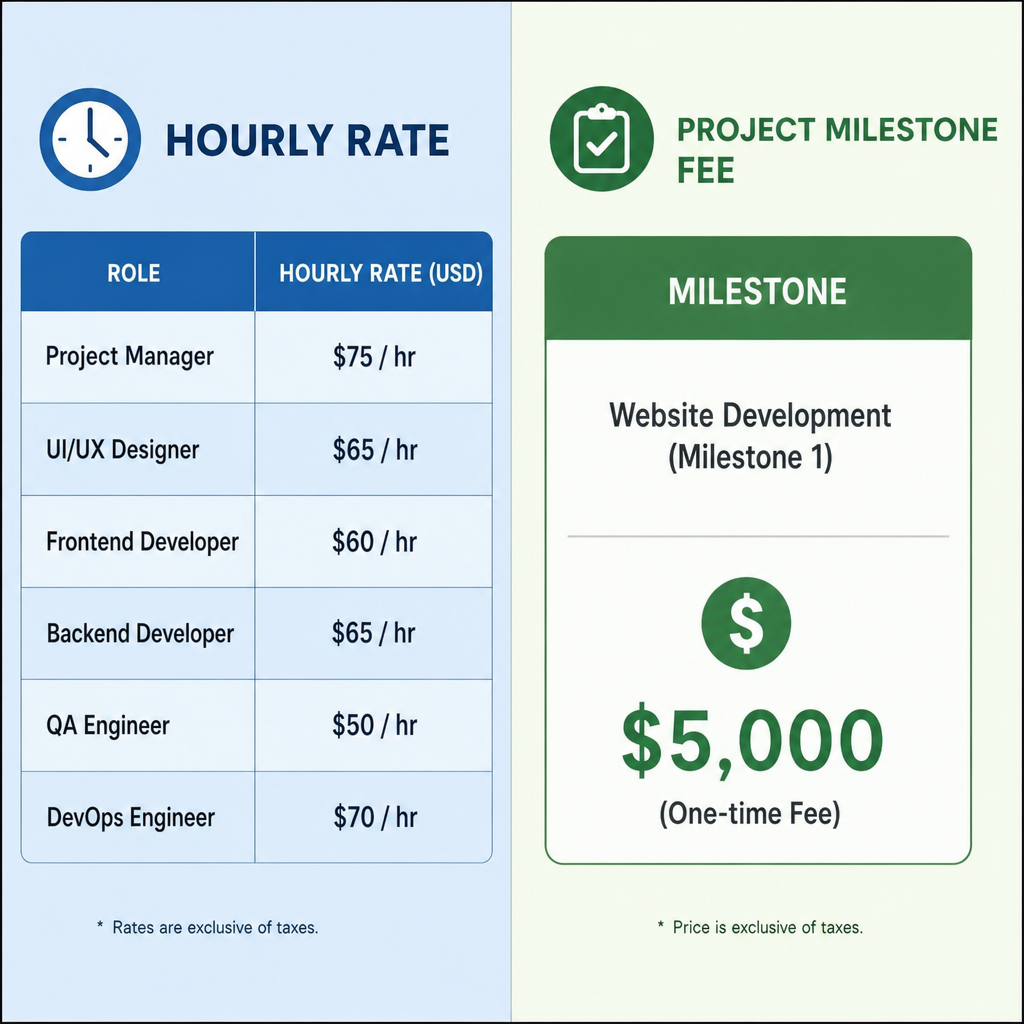
Navigating Hourly vs Fixed Price Billing Models for Maximum Transparency
Deciding how to charge for your work often comes down to choosing between hourly vs fixed price billing models. If you bill by the hour, your document needs time-tracking transparency so clients do not feel micromanaged. Instead of listing every five-minute phone call, group your time into logical daily or weekly blocks so the client sees steady progress without overwhelming details.
Conversely, flat-fee transparency focuses purely on the final result rather than the clock. Large, fixed-rate jobs benefit heavily from milestone billing—charging a portion of the total fee when specific project phases are completed—to keep your cash flow steady. When reviewing examples of invoices, consider these layout pros and cons:
- Hourly Layouts: Pro: Protects you from doing unpaid extra work. Con: Clients might scrutinize exactly how long tasks took.
- Flat-Fee Layouts: Pro: Rewards you financially for finishing efficiently. Con: Requires highly accurate upfront estimates to avoid losing money.
Ultimately, a professional billing format for independent contractors easily adapts to whichever method makes the most sense for your specific job. After determining how to present your pricing, establish clear payment terms to protect your cash flow.
Protecting Your Cash Flow with Clear Payment Terms and Late Fee Clauses
Completing the work is only half the battle; getting the money into your bank account without awkward follow-up texts is the real finish line. Setting clear payment terms and conditions directly on your document acts as the "rules of the game" for your client. Instead of hoping they pay promptly, you are explicitly telling them exactly when the check is due.
Professionals often use "Net" terms, a shorthand way to describe your payment countdown clock. For instance, using net-30 and net-60 payment schedules means the client has exactly 30 or 60 days from the invoice date to pay. Shortening that window to "Net-15" or even "Due on Receipt" keeps cash flowing much faster for most small business owners.
Because unexpected delays happen, establishing a payment grace period and a formal penalty system is crucial for protecting your income. Adding a brief note about late payment penalties for service providers—such as a 1.5% monthly fee applied after five days—shows clients you mean business. This gentle boundary rarely needs to be enforced, but its presence naturally encourages promptness.
Tying these rules together with frictionless payment instructions ensures your clients never have to guess how to send the money. Spelling out the exact digital transfer or check-mailing steps removes the final hurdle to your paycheck. As your client base grows, manually enforcing these deadlines becomes overwhelming, making automated solutions increasingly valuable.
Streamlining Your Business: Automated Invoicing Software vs Manual Templates
Typing out numbers on a blank document gets old quickly. When deciding between automated invoicing software vs manual templates, remember that "free" DIY methods often cost you hours of valuable weekend time. Shifting from a basic word processor to cloud invoicing—where your billing lives securely online—can easily save you three to five hours every month.
As your client list grows, upgrading your toolkit becomes essential. Here is a quick look at how the two methods stack up:
- Manual (Word/Excel): Free to start, but requires repetitive data entry or hunting for a specific rent invoice template every time you bill.
- Automated (Cloud Software): An invoice software for small business acts as a smart bill generator, letting you set up recurring billing so repeat clients are charged automatically.
The biggest advantage of going digital is preserving your client relationships through automated reminders. Instead of you sending an awkward "checking in" email, the system gently nudges them for you when a deadline passes. Whether you use a dedicated app or a simple text document, reviewing your math one last time is crucial. Before sending any invoice, a final review ensures prompt approval.

The Ultimate Pre-Payment Checklist: Ensuring Your Invoice Gets Approved Instantly
Sending a bill no longer means staring at a blank screen and second-guessing your formatting. You now have the tools to turn any contractor invoice example into a professional, repeatable five-minute routine.
Before hitting send, use this five-step checklist for streamlining small business billing processes:
- Audit the "Top 3": Double-check your payment terms, total amount, and client contact info to avoid delays.
- Save as PDF: Lock in your layout so nothing shifts on your client's screen.
- Draft your invoice email: Stop overthinking the message and use this script: "Hi [Name], thanks for the opportunity to work on [Project]. Attached is my bill for the completed services. Payment is due by [Date]. Please let me know if you have any questions!"
- Attach the file: Always verify the document is actually attached.
- Archive: Save a copy in a dedicated "12-Month Billing" folder for stress-free tax filing.
Start with this simple routine on your next project to see immediate results. Every time you confidently outline your work, you train clients to respect your time and pay on schedule. You've done the hard work—now go collect your paycheck.
Q&A
Question: Why does the look of my invoice matter so much?
Short answer: Presentation directly affects how fast you get paid and how clients perceive your professionalism. Clean branding that functions like a digital letterhead builds trust and can even justify premium rates. In one example, a freelance designer cut her payment wait time by five days after upgrading her invoice header. A polished, consistent layout guides clients through the invoice-to-payment cycle and removes doubt about what they owe and how to pay.
Question: What information is essential on a contractor invoice to satisfy both clients and the IRS?
Short answer: Include clear identifiers up top and use unique sequencing so accounting can process payment without chasing you. Your header should feature:
- Your Business Name
- Remittance Address (where checks should be mailed)
- Tax ID Number (placed just below your contact info, aligned with W-9 norms)
- Unique Invoice Number (use sequential numbering like #1001, #1002)
- Issue Date
- Client Contact Info
- Payment Due Date
Unique invoice numbers help both sides track which bill is being paid, preventing lost or duplicated payments.
Question: How should I itemize work so clients understand labor vs. materials?
Short answer: Treat your invoice like a detailed receipt. Separate materials from labor and use unit pricing to turn vague tasks into clear, trust-building line items. For example:
- Vague: “Kitchen sink repair – $350”
- Clear: “Material: 1 Moen Faucet – $150”
- Clear: “Labor: 2 Hours Plumbing Installation at $100/hr – $200” This transparency prevents sticker shock, creates a reliable paper trail for future support or warranty work, and is especially critical in construction and trades.
Question: Should I bill hourly or at a flat rate, and how do I present each clearly?
Short answer: Pick the model that fits the job and tailor your layout for transparency.
- Hourly: Group tracked time into logical daily/weekly blocks to show steady progress without nitpicky detail. Pro: Protects you from unpaid extra work. Con: Clients may scrutinize time spent.
- Flat fee: Emphasize deliverables and use milestone billing (partial payments at phase completions) to keep cash flowing. Pro: Rewards efficient work. Con: Requires accurate estimating to avoid losses. A professional format should flex to either model while keeping scope and expectations explicit.
Question: What payment terms and process details should I include to protect cash flow and get paid faster?
Short answer: State the “rules of the game” on the invoice:
- Use clear net terms (e.g., Net-30, Net-60). For faster cash flow, consider Net-15 or “Due on Receipt.”
- Define a brief grace period and a late-fee policy (e.g., 1.5% monthly after five days late) to encourage promptness.
- Provide frictionless payment instructions (exact steps for digital transfer or where to mail checks) so clients never guess how to pay. To streamline and avoid mistakes, consider cloud invoicing software (saves hours monthly, supports recurring billing, and sends automated reminders) and run a quick pre-send checklist:
- Audit the “Top 3” (payment terms, total amount, client contact info)
- Save as PDF
- Draft a concise email
- Attach the file
- Archive a copy for easy tax-time retrieval